StudentShare
Contact Us
Sign In / Sign Up for FREE
Search
Go to advanced search...
Free

Laser Welding of Dissimilar Metals - Lab Report Example

Cite this document
Summary
According to research findings of the paper “Laser Welding of Dissimilar Metals”, According to the heat input equation the heat input value has inversely property with the speed value, this explains the defect (undercut) which is showing up in the small values of speed, as speed were (0.8 and 1 m/min).
 …
Download full paper File format: .doc, available for editing
GRAB THE BEST PAPER94.4% of users find it useful
Laser Welding of Dissimilar Metals
Read Text Preview

Extract of sample "Laser Welding of Dissimilar Metals"

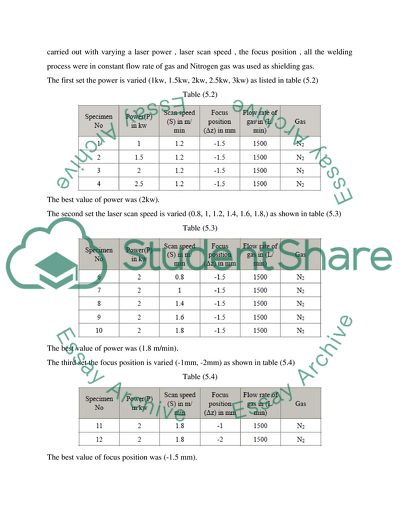
Laser Welding of Dissimilar Metals In performing laser welding we made use of 316L Austenitic Stainless Steel and Low Carbon Steel plates as the basematerials in this experiment. The chemical composition of both the base plate materials is shown in the table below as a comparison of composition of both metals, in Tables (5.1). Table (5.1) shows the Chemical composition of the materials (wt. %) These metals were received in the form of plates of 350×10×3 mm from the vendors and were precisely machined on the Milling machine in the mating areas of both the metals to avoid the gap between the metals which lead to misalignment. Both the metals were mounted in butt joint geometry as shown the figure (5.1) . Figure (5.1) the butt joint geometry of the base metal Laser welding of thee metals was performed by making use of RTM machine which has the capacity: CO2 6kw, with 4D (X, Y, Z, A`) work table geometry having dimensions of 1m×1.5m. The joints are positioned with respect to the high laser using power machine. The table is scanned along the (Z) direction to form continuous weld , three sets of continuous welds are carried out with varying a laser power , laser scan speed , the focus position , all the welding process were in constant flow rate of gas and Nitrogen gas was used as shielding gas. The first set the power is varied (1kw, 1.5kw, 2kw, 2.5kw, 3kw) as listed in table (5.2) Table (5.2) The best value of power was (2kw). The second set the laser scan speed is varied (0.8, 1, 1.2, 1.4, 1.6, 1.8,) as shown in table (5.3) Table (5.3) The best value of power was (1.8 m/min). The third set the focus position is varied (-1mm, -2mm) as shown in table (5.4) Table (5.4) The best value of focus position was (-1.5 mm). Figure (5.2) The focus position of laser beam on the work surface (surface is zero point). Radiographic Test (X-ray) The process were taken place of all samples after welding by using x-ray machine, the radiographic equivalent factors were selected according to metal and the thickness of the samples. The results show some welding defects in some samples and rest of the samples were acceptable. The machine parameters used in the X-ray test was 145 volt, 3mlampair, and 25 second. Tensile Test Tensile test of welding joint was done on Zwick Roell universal test machine controlled by computer, the test were performed at the room temperature to determine the tensile strength and the yield strength. The samples whose thickness and gauge length are (3mm) and (300 mm) were prepared to the test according the AWS standards; the figure (5.3) illustrated the dimensions of the samples. Figure (5.3) The dimensions of the samples (the unit in mm) Macrostructure and Microstructure The samples were cross-sectioned, ground by using (80, 120, 320, 600, 1200) grinding paper and polished by Diamond sucbention for metallurgical examination. The mounted specimens were etched in a solution comprised of 50% Hydraulic acid + 25% Nitric acid + 25% water and ethyl alcohol for 20–60 s until the microstructure was revealed. The microstructure and microhardnees distribution were characterized by optical microscope. Results and Discussion:- Nondestructive Tests:- Visual Examination:- Visual inspection was performed for all samples and showed some defects as the laser parameters varied, the results and the defect causes are listed in the table (6.1) below. Table (6.1) shows the Results of Visual Examination Effect of laser power The effect of heat input as a function of laser power, H, = P/S, was clarified using type 316L and low carbon steels. Both welding speed and focus position were kept constant (1.2mm/min) and (-1.5 mm) respectively. The penetration depth increased with increasing laser power. Complete penetration for the 3 mm base metal was obtained at laser power equal to or greater than 2kw. Laser power has a less influence on both weld profile and (HAZ) width. Effect of welding speed:- The effect of welding speed was investigated at the optimum laser power (2 kW) and (-1.5) focus position. The relationship between welding speed and heat affected zone (HAZ) for both base metals. The (HAZ) increased sharply with the decrease in welding speed from (1.8 to 0.8) m/mm. Effect of the focus position Focus position, is the distance between specimen surface and the optical focal point. In order to study its effect on both penetration depth and weld profile, complete penetration butt welds were made using previously obtained optimum laser power (2 kW) and optimum welding speed (1.8 m/min). The values has been changed from (-1 to -2 mm) include (-1.5 mm). The penetration depth decreased on changing the defocus position from (-1.5) to (-1) mm. Then, the penetration decreased on changing the defocus position to (-2 mm). Radiographic Test Results (X-ray) Table (6.2) shows the Results of X-ray test Effect of laser power The effect of laser power welding is clearly leads to undercut as the increasing power values; samples which is (2.5 and 3 kw) were used. Effect of laser speed:- According to the heat input equation the heat input value has inversely property with the speed value, this is explains the defect (undercut) which is shows up in the small values of speed, as speed were (0.8 and 1 m/min). The incorrect procedure in laser welding process in the sample No (9) lead to misalignment which produce a gap between the stainless steel and the low carbon steel and that is produce to undercut. Mechanical Tests Tensile Test Results Mechanical property of the first set welded samples is shown in Table (6.3). Table (6.3) The Tensile Test Result for the first set. Figure (6.1) The relationship between the stress in (N/mm2) and strain in (%) in first set Figure (6.2) The relationship between the power and tensile strength Mechanical property of the second set welded samples is shown in Table (6.4). Table (6.4) The Tensile Test Result for the Second set. Figure (6.3) The relationship between the stress in (N/mm2) and strain in (%) in second set Figure (6.4)The relationship between the welding speed and tensile strength Mechanical property of the third set welded samples is shown in Table (6.5). Table (6.5) The Tensile Test Result for the third set. Figure (6.5) The relationship between the stress in (N/mm2) and strain in (%) in third set Figure (6.6) The relationship between the focus position and tensile strength In the figure (6.7) shows the result of the welded samples were less than the typical values of stainless steel and higher than the steel values, These results indicate that: the Tensile strength has the tendency to increase at first and then decrease when the welding heat input is increased, and the values of Tensile strength, With one exaption in the first sample (1kw,1.2m/min and -1.5 mm) ,the broken was in weld metal the rest of the samples brakes in low carbon said , the reason of that exaption is incorrect procedures which lead to misalignment. Figure (6.7) The relationship between the stress in (N/mm2) and strain in (%) Figure (6.8) The location of break in the specimen The microhardnees Test Hardness tests were carried out in samples welded, the samples were prepared by grinding, polishing and etching, the test was by applied (50gf) load for (15 sec) as indication time, and the samples were tested in weld metal and base metal. In general the hardness profiles show an expected high hardness in weld metal, the hardness values of weld metal were around (400 HV) which straightly high than the hardness values of low carbon steel and stainless steel, the reason is using the Nitrogen gas as shielding gas in laser welding process, The Investigations shows using Nitrogen as shielding gas in welding increases the hardness value [22]. The table (6.6) shows the results of micro hardness test. The table (6.6) shows the results of microhardnees test in weld metal area Figure (6-9) The relationship between the power and Micro hardness Figure (6-10) The relationship between the welding speed and Micro hardness Figure (6-11) The relationship between the focus position and Micro hardness Macrostructure and Microstructure Macrostructure of weld joint Fig. (6.12) shows the overall optical cross sections of laser welded 316L Stainless Steel and 1009 Low Carbon Steel joints under the conditions of different heat input. From the figure, it can be seen that there exists some influence of heat input on the joint geometry, which mainly reflects the change of weld penetration and weld width. When the heat input is very low, obvious incomplete penetration appears. As the heat input is increased, the weld penetration is increased and the weld appearance becomes better. At the same time, an increase in heat input results in slightly broadening the top side of the weld. However, the bottom width of the weld becomes obviously larger when the heat input is higher. That is to say, the weld width difference between the top and the bottom becomes smaller as the heat input is increased. The main reason may be that the cooling rate decreases with increasing the heat input [22]. Therefore, when the heat input is higher, more volume of the base metal will melt and the welding heat has more time to conduct into the bottom from the top. And the different of cooling rate in between the base metal (316L and 1009) produce a crack in the low carbon steel. In Fig. (6.12), some typical defects also appear in the welded samples. When the heat input is high , and using (N2) as shielding gas lead to produce porosity , low focus position lead to lack penetration , (The magnification =50X) Figure (6.12) a) the section area of specimen (1) Figure (6.12) b) the section area of specimen (2) Figure (6.12) c) the section area of specimen (3) Figure (6.12) d) the section area of specimen (4) Figure (6.12) e) the section area of specimen (5) Figure (6.12) f) the section area of specimen (6) Figure (6.12) g) the section area of specimen (7) Figure (6.12) h) the section area of specimen (8) Figure (6.12) I) the section area of specimen (9) Figure (6.13) j) the section area of specimen (10) Figure (6.12) k) the section area of specimen (11) Figure (6.12) l) the section area of specimen (12) Microstructure of weld joint According to the results of Macrostructure, the best and worst welded samples were chosen to observe the microstructures. Fig (6.13) illustrates the typical microstructure of welded 316L and 1009 joint. As shown in Fig. (6.13) (a), (b), 1009 and (c), (d) 316L base metal far from the weld centre presents the same typical rolled structure as in the wrought alloy. The grain size is non-uniform and some fine recrystallized grains distribute around the large elongated crystals. As shown in Fig. (6.13) the transition zone between base metal and fusion bead is excellently joined. magnification = 200X Read More
Tags
Cite this document
  • APA
  • MLA
  • CHICAGO
(Laser Welding of Dissimilar Metals Lab Report Example | Topics and Well Written Essays - 1750 words, n.d.)
Laser Welding of Dissimilar Metals Lab Report Example | Topics and Well Written Essays - 1750 words. https://studentshare.org/engineering-and-construction/1806011-laser-welding-dissimilar-metal
(Laser Welding of Dissimilar Metals Lab Report Example | Topics and Well Written Essays - 1750 Words)
Laser Welding of Dissimilar Metals Lab Report Example | Topics and Well Written Essays - 1750 Words. https://studentshare.org/engineering-and-construction/1806011-laser-welding-dissimilar-metal.
“Laser Welding of Dissimilar Metals Lab Report Example | Topics and Well Written Essays - 1750 Words”. https://studentshare.org/engineering-and-construction/1806011-laser-welding-dissimilar-metal.
  • Cited: 0 times

CHECK THESE SAMPLES OF Laser Welding of Dissimilar Metals

Robert Gagne's Conditions of Learning

Robert Gagne's Conditions of learning Professor Date Introduction Learning is something that most people are fond of or want to do.... It is an ideal process in the development of people and particularly among the coming generation.... Learning is essential since it enables individuals to coexist with one another, share things about each other and also learning enables individuals to be in a state of mind that is commonly referred to as alert and knowledgeable....
4 Pages (1000 words) Research Paper

The Development of the Biochemical Stents

laser cutting techniques feature prominently in the manufacture of stents (Shrivastava 25).... The use of laser is necessary for the purposes of ensuring precision.... The laser cutting processes usually involves the application of complex geometries that are determined by the minute measurements applied within the process....
11 Pages (2750 words) Essay

Diagnostic Methods of Data Collection - Organizational Development and Change

After, the dissimilar problems have been identified and solutions discovered; the comprehensive hospital and everyone in its working environment is expected to put into practice the new ways.... Significantly, as an organization development practitioner, one's core objectives would entail comprehending the significance of the problem solving relationships in the hospital as a working environment, identify methods to be used in diagnosing and collecting data and also,… Generally, the hospital is a sensitive working environment since people's lives are mostly at stake and there are left to the hands of the staff hence their concentration DIAGNOSTIC METHODS OF DATA COLLECTION (ORGANIZATIONAL DEVELOPMENT AND CHANGE) Significantly, as an organization development practitioner, one's core objectives would entail comprehending the significance of the problem solving relationships in the hospital as a working environment, identify methods to be used in diagnosing and collecting data and also, understand and utilize techniques for analyzing information and data acquired from the overall process....
2 Pages (500 words) Essay

How has Modern advances changed welding technology since anicent times

During the Bronze Age, small round golden boxes were made by pressure welding of lap joints together.... While doing this, a blacksmith should use tongs handle the metals since they are extremely hot to be handled by bare hands.... The process of forging metals and blacksmithing was extremely dangerous.... Pressure and… There are several energy sources that can be used for welding process.... In an industrial process, welding activity can be performed in several It is a dangerous process and precautions must be taken in order to avoid electric shock, burns, vision damage, exposure to UV radiation, and inhalation of toxic fumes and gases....
5 Pages (1250 words) Essay

Welding Thin Materials

An arc between the metals being joined and the electrode is formed by means of an electric current.... Tungsten inert gas (TIG) welding is a welding method in which, a non- Welding Thin Materials Affiliation Welding Thin Materials Shielded metal arc welding (SMAW) is a process that uses an expendable electrode plastered in flux to melt and fuse metals.... An arc between the metals being joined and the electrode is formed by means of an electric current....
2 Pages (500 words) Essay

Selective Laser Melting of Iron

More so, during laser processing, there is a likelihood of occurrence of the balling phenomena.... More so, during laser processing, there is a likelihood of occurrence of the balling phenomena.... Thus, a thin powder layer thickness, which is less than 100mm, is more recommendable for laser melting.... This is besides the optimization of laser types and parameters.... In this process, heat generated from a CO2 laser is used to sinter systematic powder layers from 3D objects arranged layer by layer [8]....
1 Pages (250 words) Essay

Main Types of Welding

It is employed to weld delicate aluminum pipes and brazing softer metals.... The welding wire is positioned at the extreme end of the gun and operates within the preset rate.... It might also be difficult to establish the initial arc in this type of welding.... According to The paper “Gas Metal Arc welding, Tungsten Inert Gas, Arc welding, Gas or Oxy-Acetylene welding, and Cutting Gas Metal Arc welding" is an informative variant of a term paper on physics....
2 Pages (500 words) Article

Welding - Technologies Ensuring That Metals or Thermoplastics Are Joined through Fusion

"Welding - Technologies Ensuring That metals or Thermoplastics Are Joined through Fusion" paper states that the technique deployed in the process of welding ultimately affects the geometry weld in terms of the appearance of the weld.... hellip; Welding involves the use of different technologies to ensure that metals or thermoplastics are joined through fusion.... This is a process whereby metals are joined by high-temperature heating in order to ensure the base metals being joined melt and a filler material cools around the heated section to form a joint which is strong as the base material....
7 Pages (1750 words) Assignment
sponsored ads
We use cookies to create the best experience for you. Keep on browsing if you are OK with that, or find out how to manage cookies.
Contact Us